Easter is just around the corner, and what better way to celebrate than with a handmade bunny bag, perfect for filling with sweet treats? Whether you’re making it for little ones, as a festive gift, or just for fun, this cute project will add a special touch to your Easter celebrations.
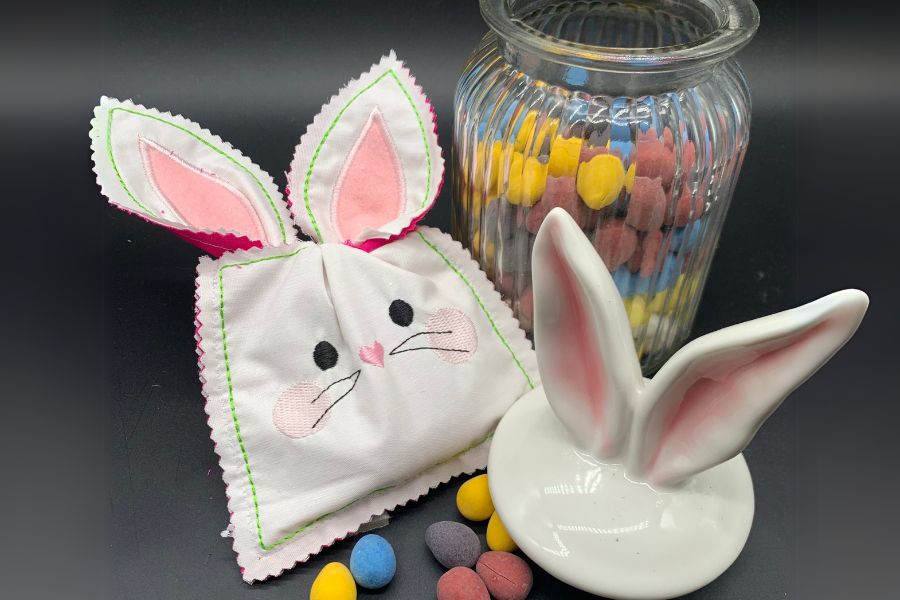
In this step-by-step tutorial, I’ll show you how to create your very own bunny bag using EL Digitizing Software, with easy-to-follow instructions. And for our Design Doodler fans—don’t worry, we’ve got you covered too! You’ll find step-by-step guidance for both software options, making it easy to hop into this fun project no matter which program you use.
Let’s get stitching and bring this bunny bag to life!
Materials:
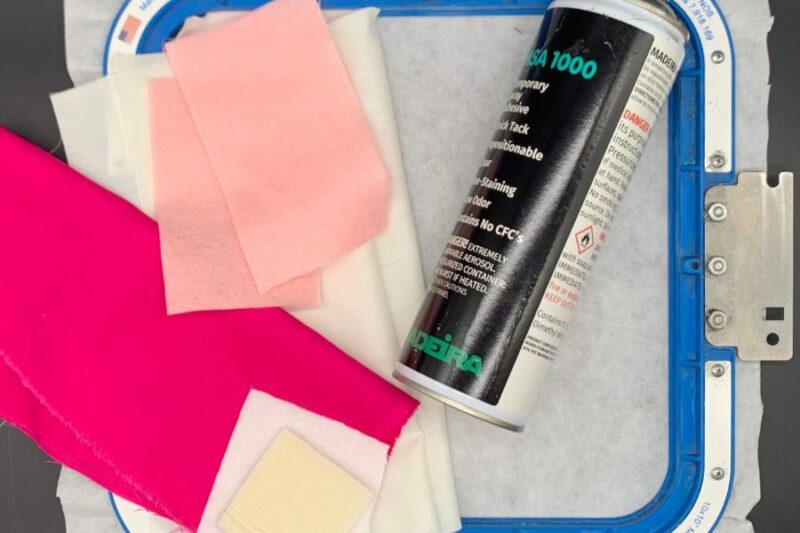
- 10 inch hoop with light weight cutaway or tearaway stabilizer
- Two 10×10 inch pieces of woven cotton or cotton/poly lightweight fabric in white
- Two 10×10 inch pieces of woden cotton or cotton/poly lightweight fabric in pink
- Two 2×4 inches of pink felt
- 2×2 inch piece of ¼ inch “sew foam” any type of soft foam will do
- 2×2 inch piece of white fur
- Temporary embroidery spray
- (Tape if desired)
- Embroidery software (instructions are provided for):
Creating an Embroidered Bunny Bag on EL Digitizing Software
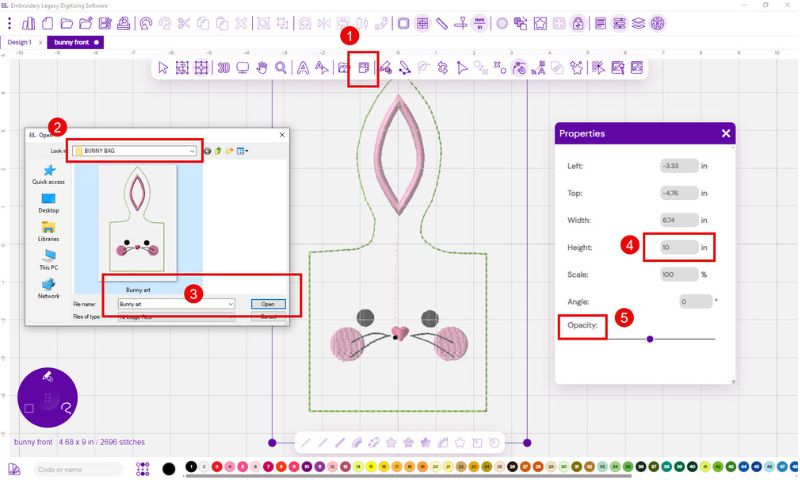
Insert your artwork (the front and back artwork are inserted in the same way):
- Select Insert Backdrop
- When your navigation box pops up select your file location
- Select the file
- Resize to 10 inches
- Change the opacity if you like
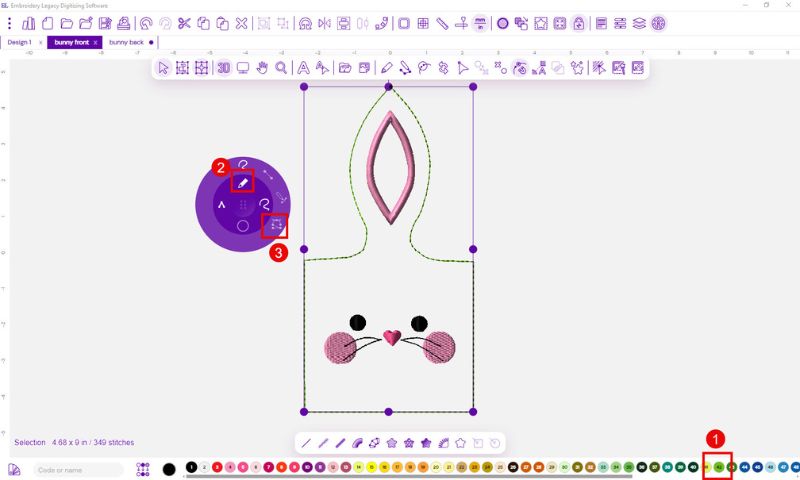
Digitize the outline
- Choose your color
- Select the Run Brush
- Use the quick draw tool using R and L nodes
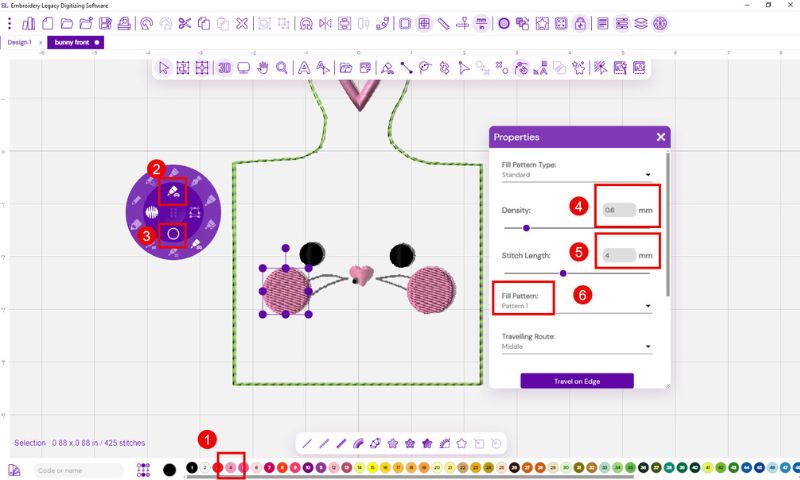
Digitize the cheeks
- Select your color
- Choose the fill brush (tatami is default)
- Choose the circle shape tool
- Open the properties tab and set density to .60 mm (loose)
- Set stitch length to 4 mm
- Select your pattern- we chose pattern 1
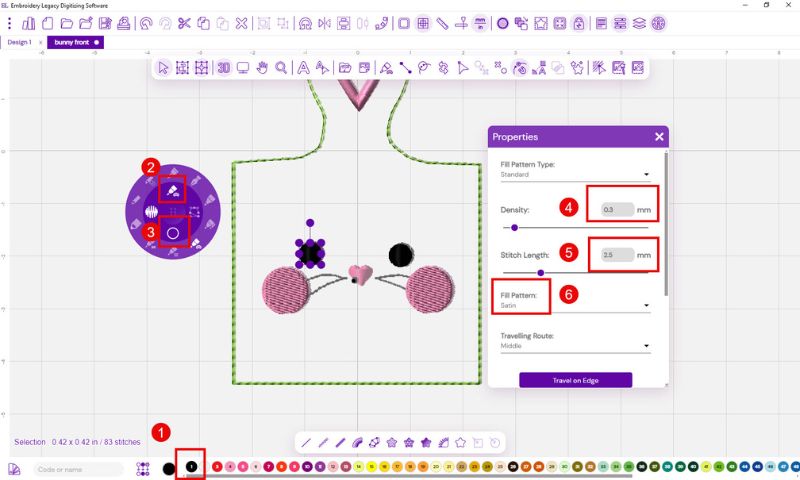
Draw the bunny eyes (this is the same procedure as the cheeks using the circle tool)
- Choose your color
- Select the fill shape brush
- Choose the circle tool
- Open the properties tool and set density to .30 mm
- Set your stitch length to 3.5 mm
- Choose fill pattern satin
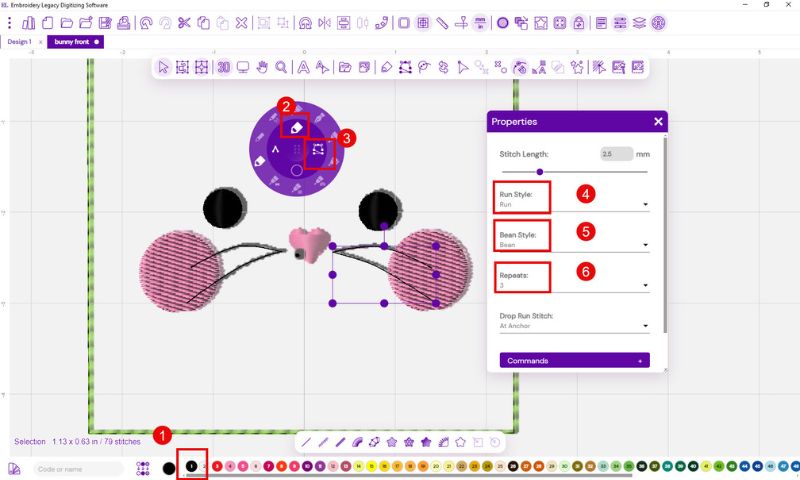
Digitize the whiskers (we will use a running stitch here doubled)
- Choose your color
- Select the Run Bean brush, this is a heavier stitch
- use the quick draw tool
- Run Style Run
- Bean style bean
- Repeats 3
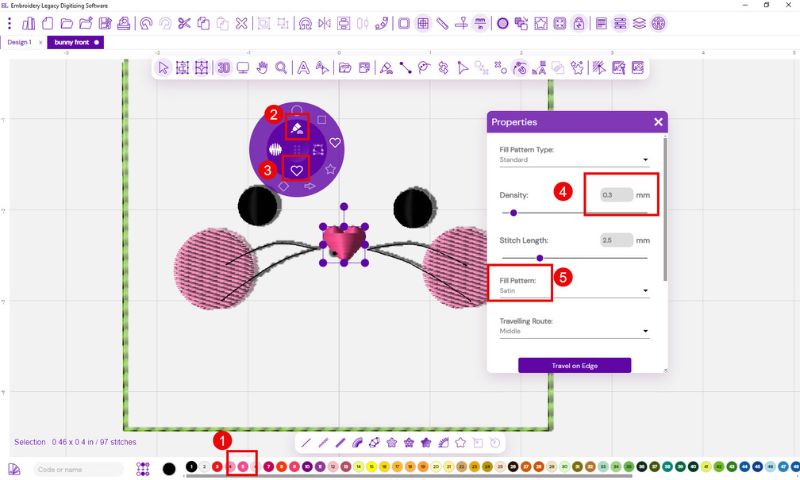
Digitize the nose (we will use the heart shape tool here)
- Choose your color
- Select the fill brush
- Choose the heart shape tool
- Set density to .30
- Choose Satin fill
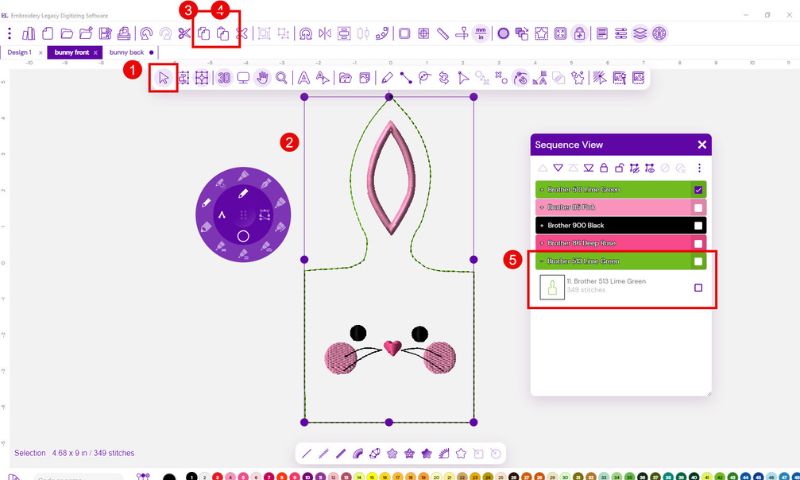
Digitize the outline again
- Open the select tool
- Select the original outline
- Choose the copy tool
- Using the Paste Tool paste your duplicate
- The duplicated outline will appear in the correct position at the end
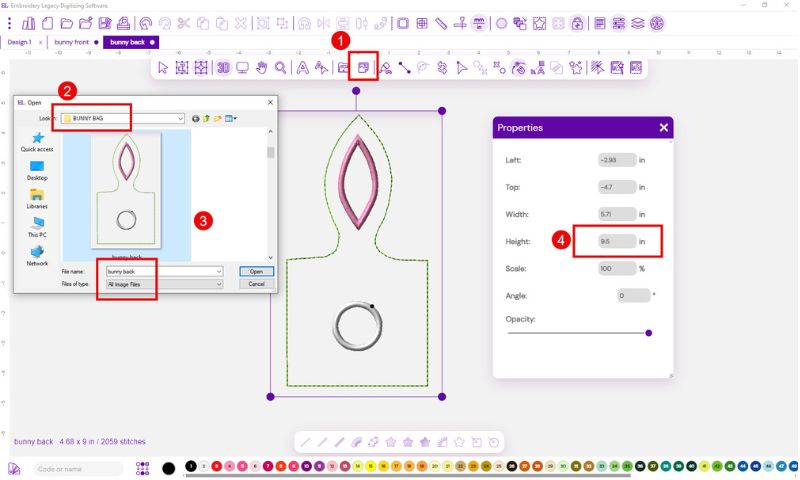
Digitize the back of your bunny bag
- Select Insert Backdrop
- When your navigation box pops up select your file location
- Select the file
- Resize to 9.5 inches
- Change the opacity if you like
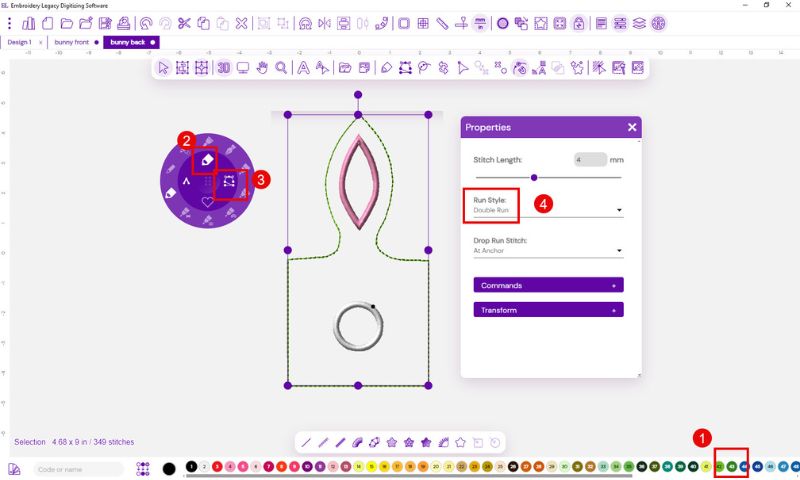
Digitize your outline
- Choose your color
- Select the run bean brush
- Use the quick draw tool
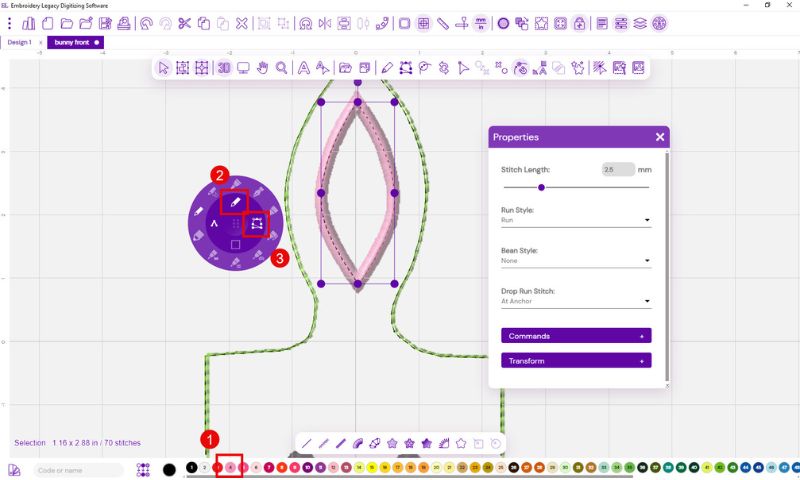
Digitize the ear tack down line
- Select your color
- Choose the run brush
- Use the quick draw tool to enter
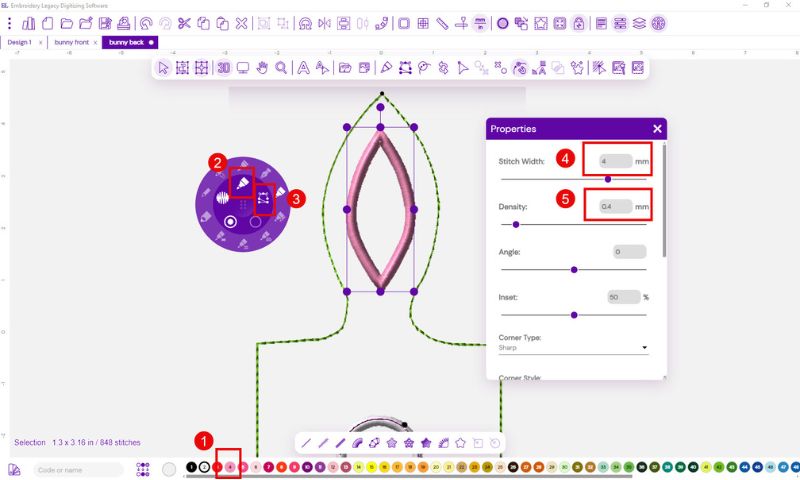
Digitize the ear satin line
- Select your color
- Select the Steil (satin) brush
- Use the quick draw
- Set width to 4 mm
- Set density to .40 mm
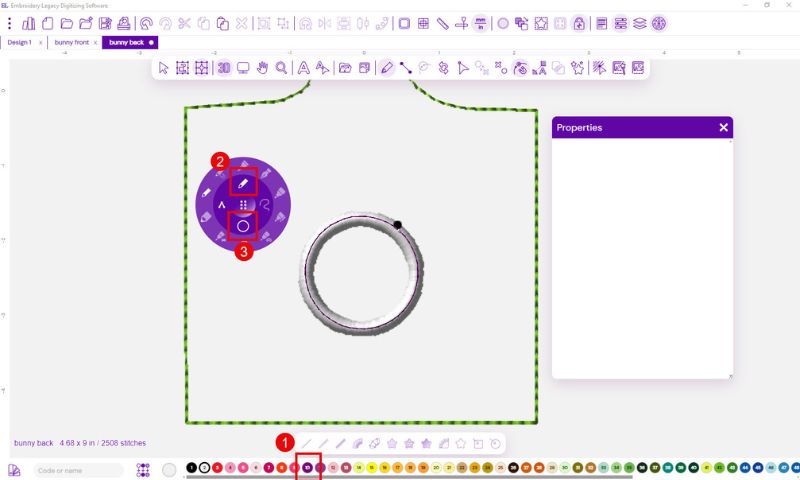
Digitize the tail placement line
- Choose a color (we chose a different color than the final lines
- Select the run brush
- Use the circle tool
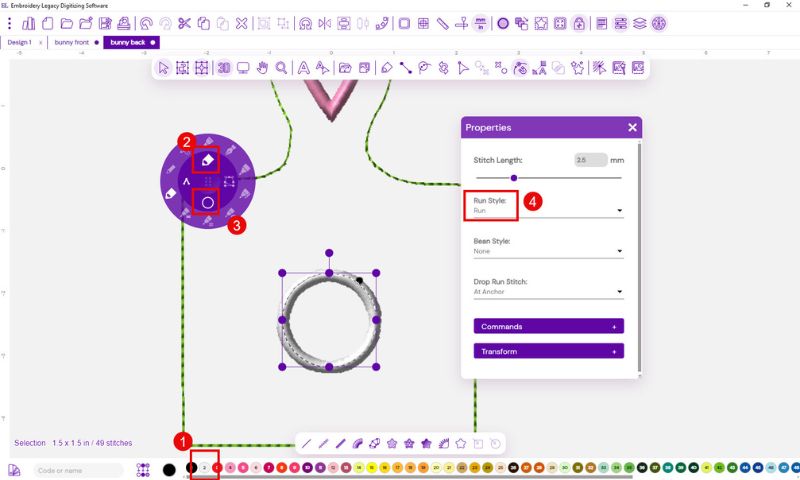
Digitize the tail tack down line
- Choose your tack down color
- Select the run bean brush
- Use the circle tool
- Set bean style to run
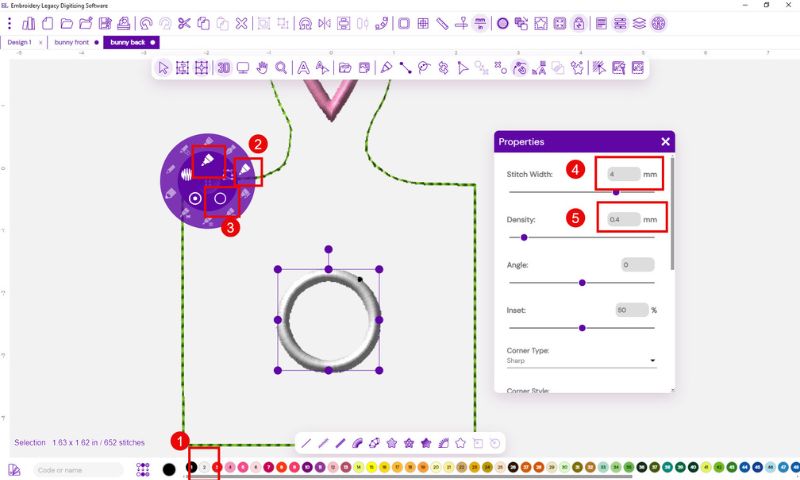
Digitize the tail satin line
- Choose your color
- Select the steil (satin) stitch brush
- Choose the circle tool
- In the properties box set your stitch width at 4 mm
- Set your density to .40
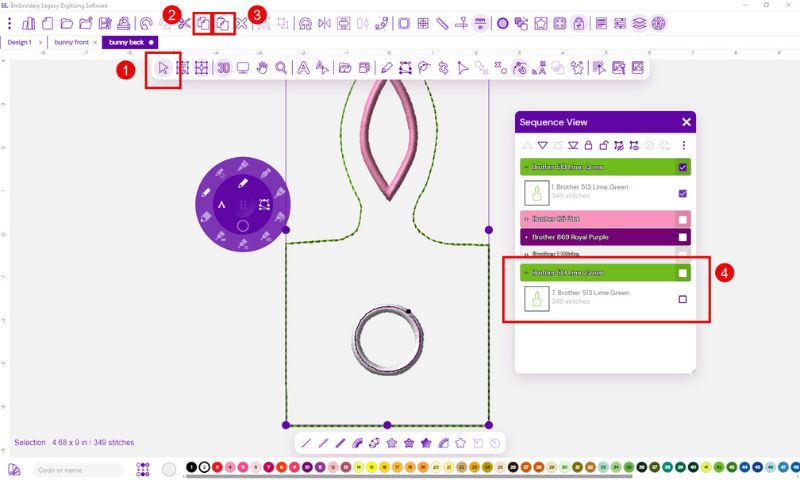
Digitize the final outline
- Select the original outline
- Using copy tool copy the object
- Use the paste tool to paste in place
- The object will appear in the last position and will stitch last

Creating an Embroidered Bunny Bag on Design Doodler
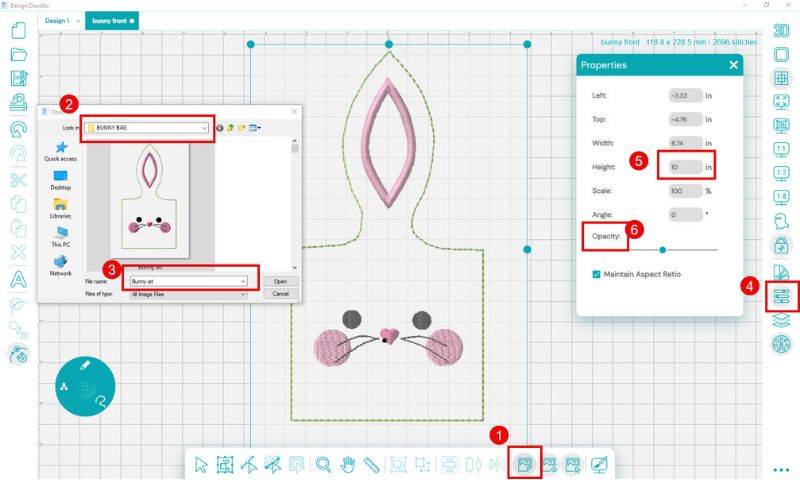
Insert Artwork
- Select Insert backdrop
- Navigate to your file location
- Select your file and open
- Open properties tool
- Set bunny front size to 10 inches
- Change the opacity if you like
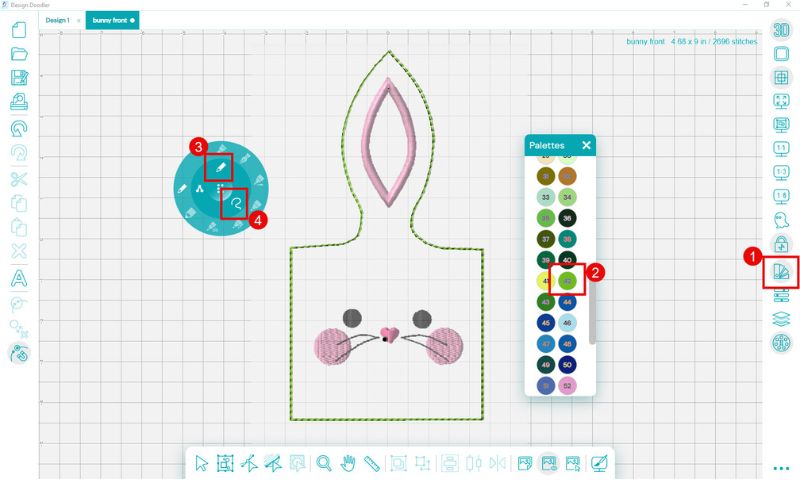
Digitize the Outline
- Open your color palette
- Select your color
- Choose the run brush
- Select the free draw option
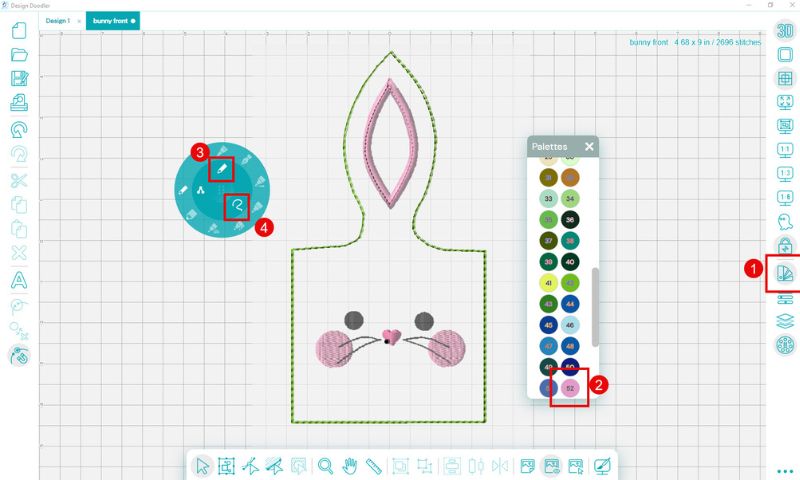
Digitize the ear tack down
- Open your color palette
- Select your color
- Choose the run brush
- Select the free draw option
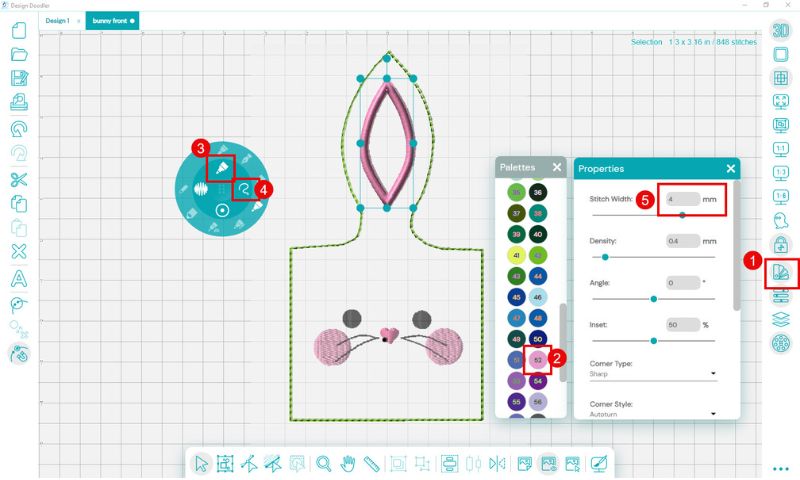
Digitize the satin stitch cover
- Open your color palette
- Choose your color
- Select the Steil (satin) brush
- Choose the free draw tool
- In the properties tab set stitch width to 4 mm
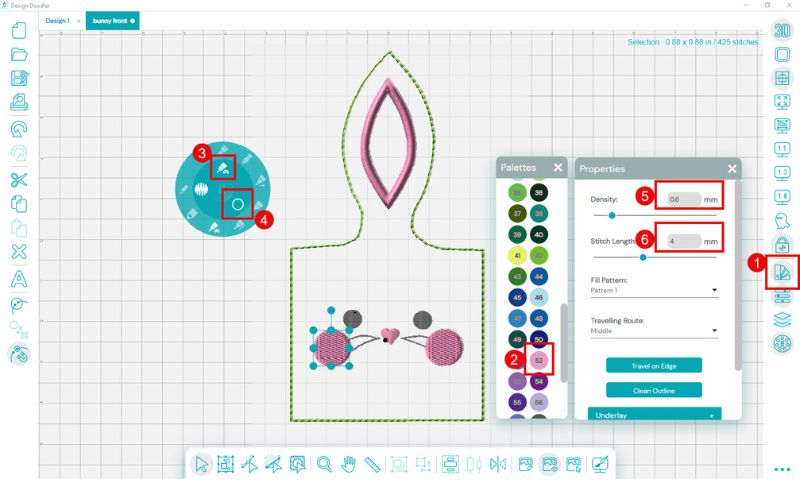
Digitize the cheeks
- Open your color palette
- Choose your color
- Select the Fill brush
- Choose the circle option
- Under the properties tool set density to .6 mm
- Set stitch length to 4 mm
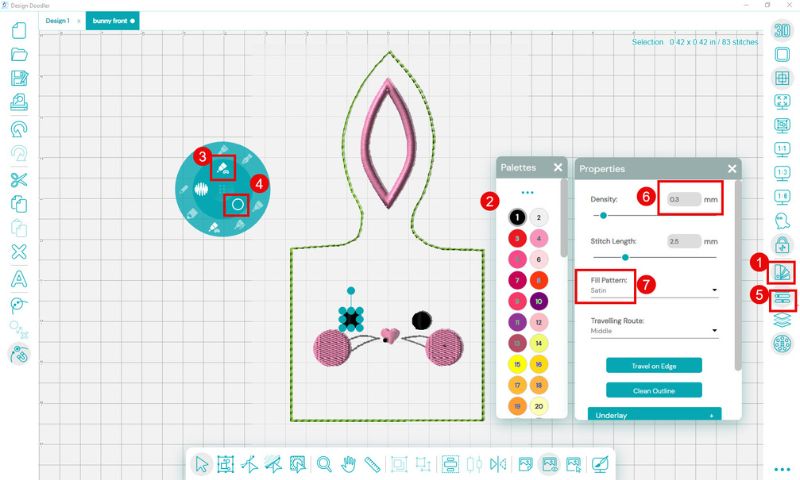
Digitize the Eyes
- Open your color palette
- Choose your color
- Select the Fill brush
- Choose the circle option
- Open properties tool
- Under the properties tool set density to .3 mm
- Set stitch type to satin
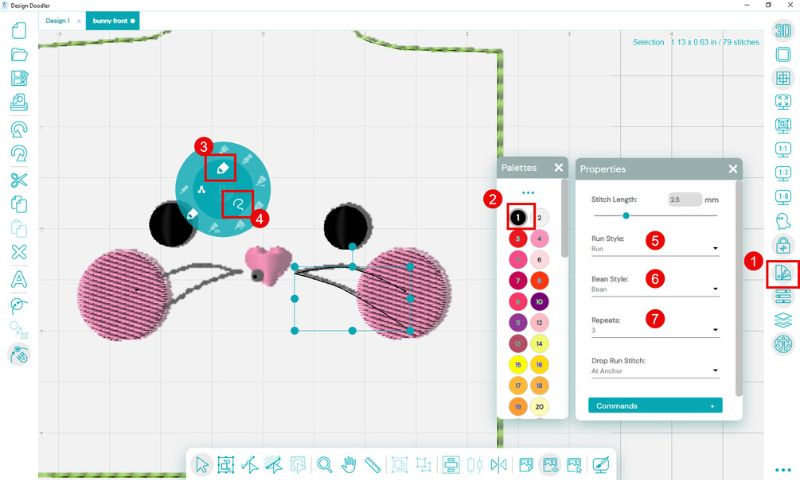
Digitize the whiskers
- Open your color palette
- Choose your color
- Select the Run Bean brush
- Choose free draw
- In the properties tool choose run
- Bean style run
- Number of repeats 3
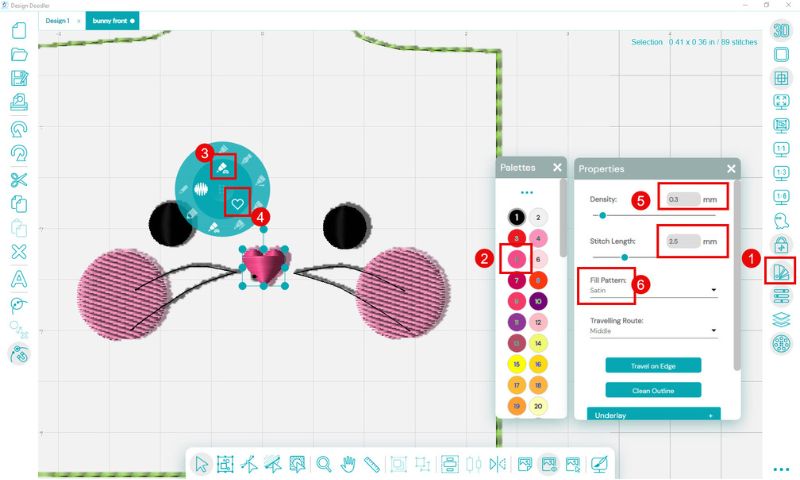
Digitize the nose
- Open your color palette
- Choose your color
- Select the fill brush
- Choose the heart shape option
- In the properties tool set density to .30 mm
- Set fill pattern to satin
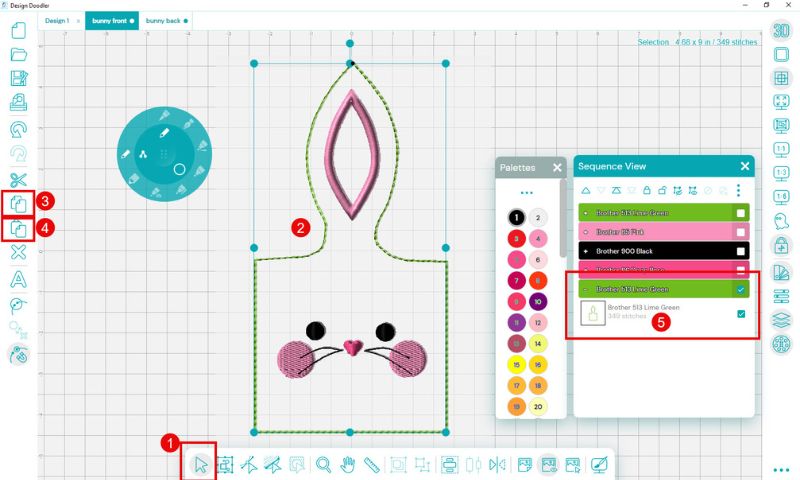
Digitize the back
- Open the Select Object tool
- Select the digitized outline (green) with the select tool
- Copy the object
- Paste the object in place
- You will see it appear in the last position of the sequence
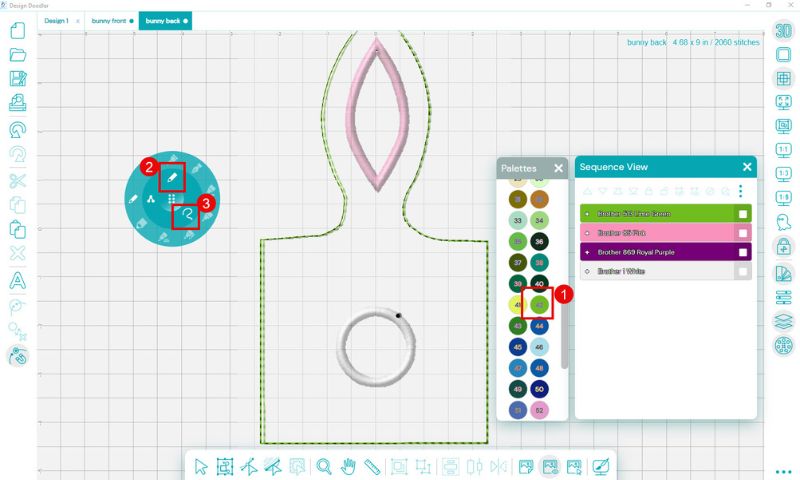
Creating the back of the bunny
- Choose your color from the color palette
- Select the run brush
- Free draw option
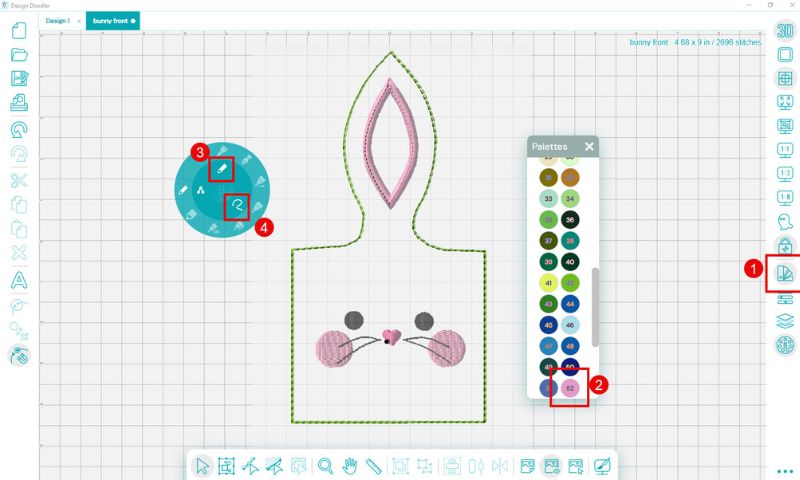
Digitize the ear tack down
- Choose your color
- Select the run brush
- Choose the free draw option
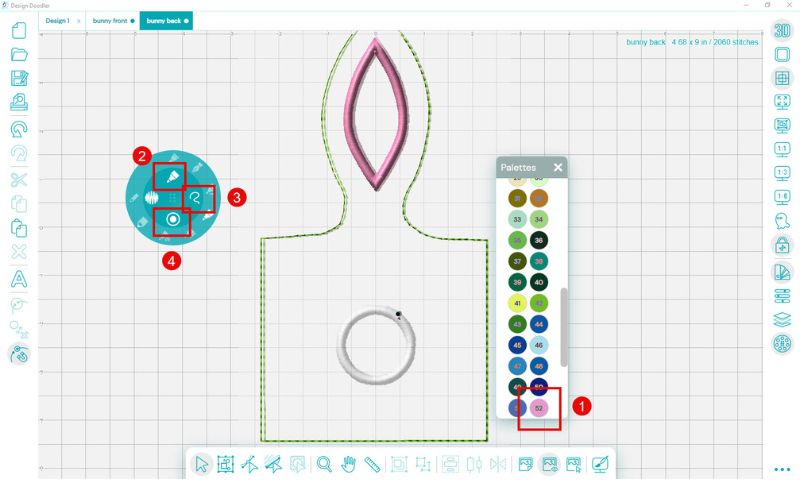
Digitize the ear satin stitch cover
- Select your color
- Choose the Steil (satin) brush
- Choose free draw
- Set your width to 4 mm either using the width option or opening the properties tool
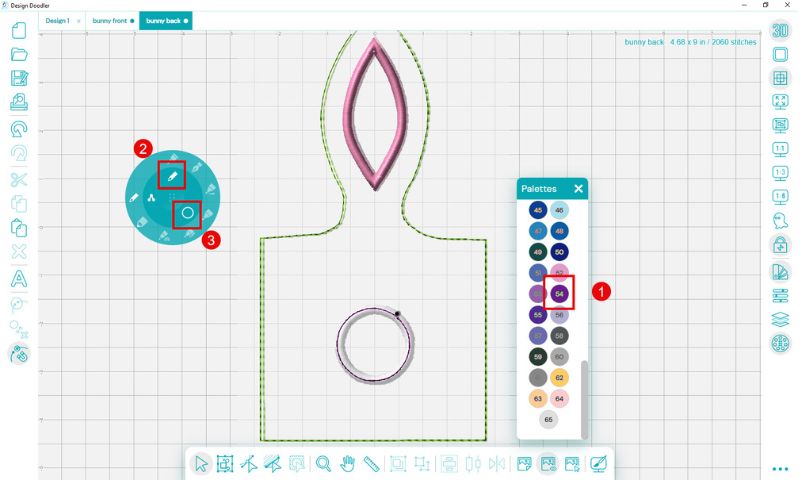
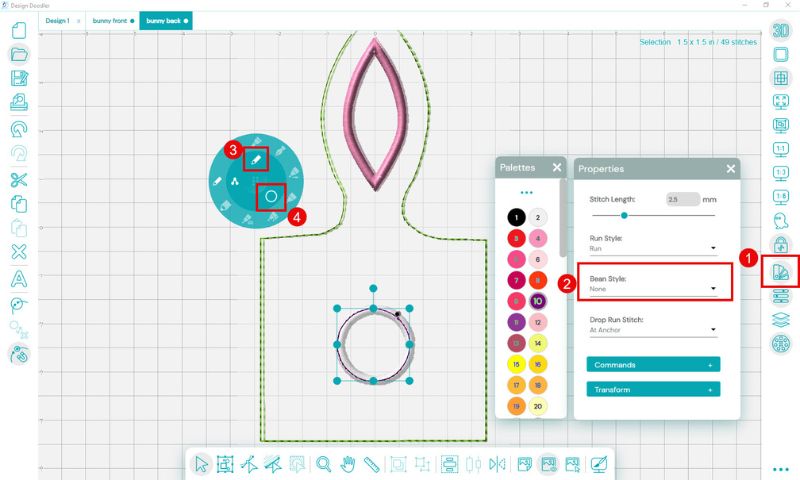
Digitize the tail placement line
- Select your color (for placement line we chose purple)
- Select the run brush
- Choose the circle option
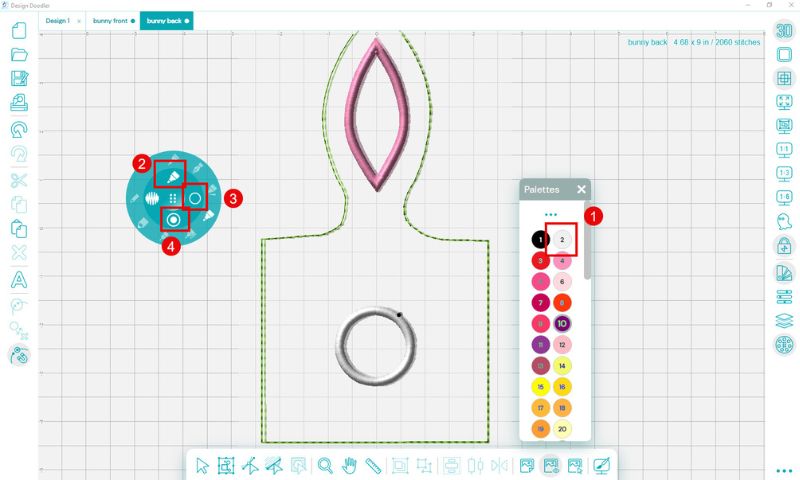
Digitize the tail tack down line
- Open color palette
- Choose your color (we chose white)
- Select the run brush
- Choose circle option
Digitize the tail satin cover stitch
- In the color palette, choose your color
- Select the steil (satin) brush
- Choose the circle tool
- Under width option, select 4 mm
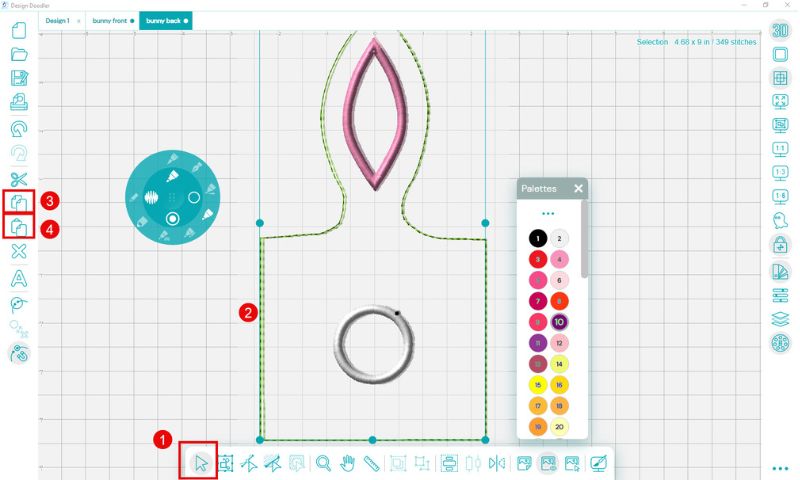
Digitize the bag outline
- Open the Select Object tool
- Select the digitized outline (green) with the select tool
- Copy the object
- Paste the object in place
- You will see it appear in the last position of the sequence
Embroidering Your DIY Easter Bunny Bag
Let’s make this bunny bag
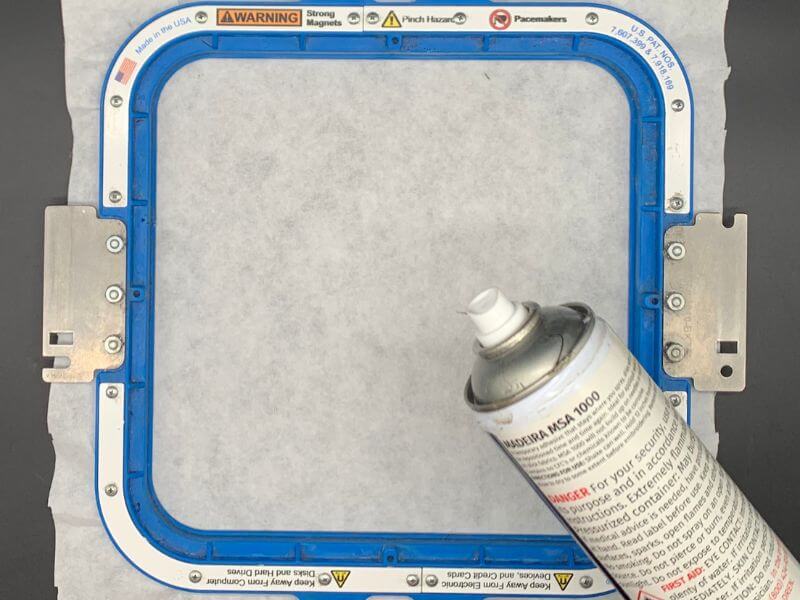
- Hoop a piece of lightweight tearaway or cutaway stabilizer
- Lightly spray the stabilizer and lay down one piece of the white material
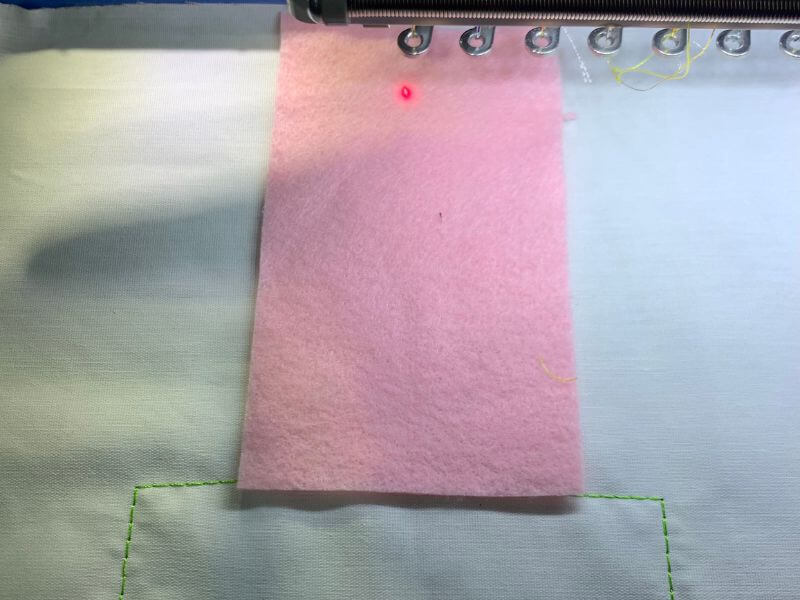
3. Insert in machine and stitch the bunny bag outline
4. Lay down the pink felt in the ear area and stitch the tack down line
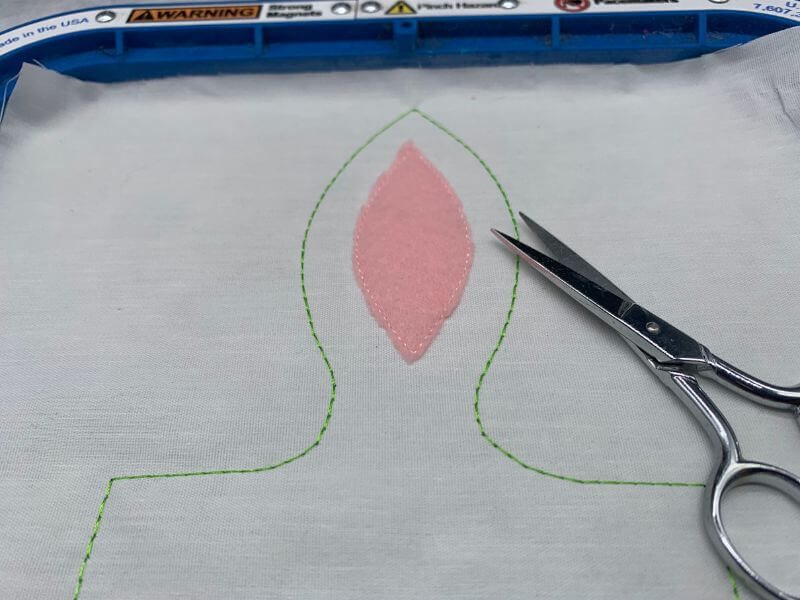
5. Remove from machine and closely trim away the excess felt
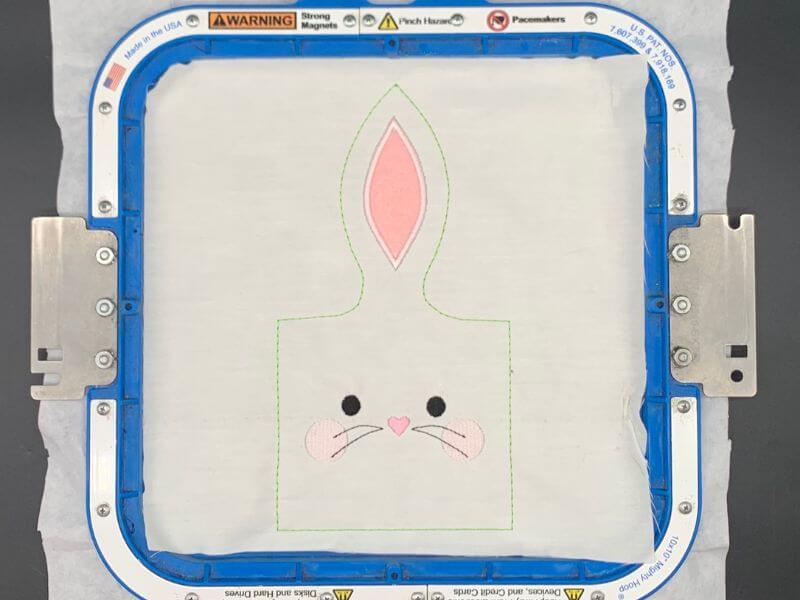
6. Return to the machine and stitch through the end of the face design. We will need to remove in order to apply the back of the stitch out.
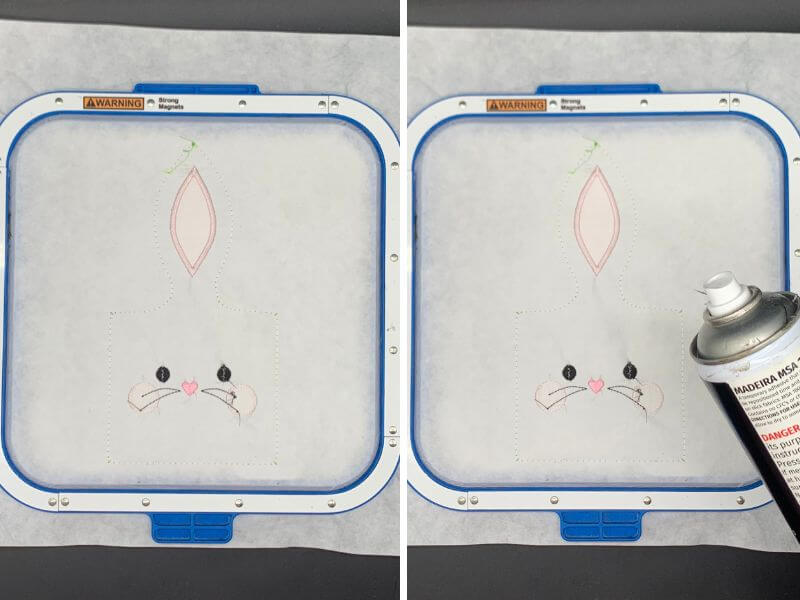
7. Lay the hoop face down and lightly spray the fabric with temporary embroidery spray.
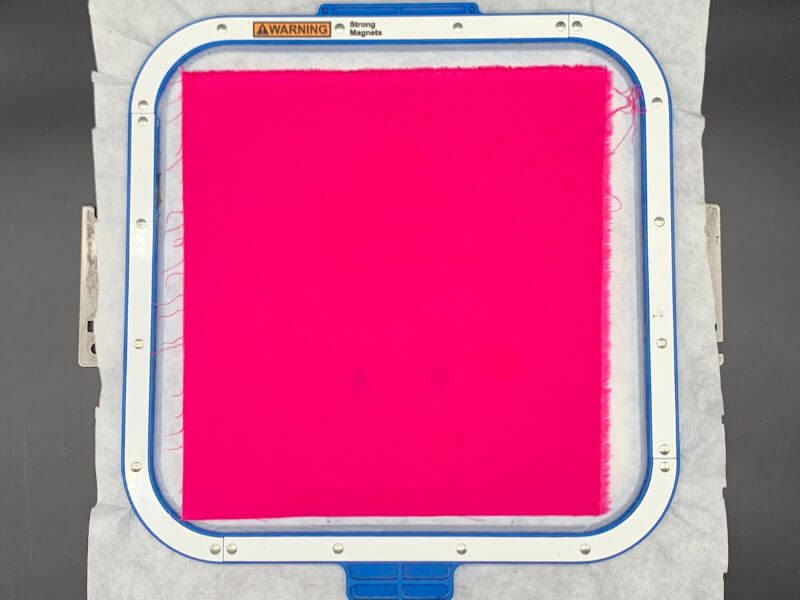
8. Lay the dark pink fabric over the stitchout securing with tape if desired.
9. Stitch the final outline
10. Remove from hoop, trim leaving about 1 inch around the design and set aside
Insert cropped fabric
Let’s make the back of our bunny bag
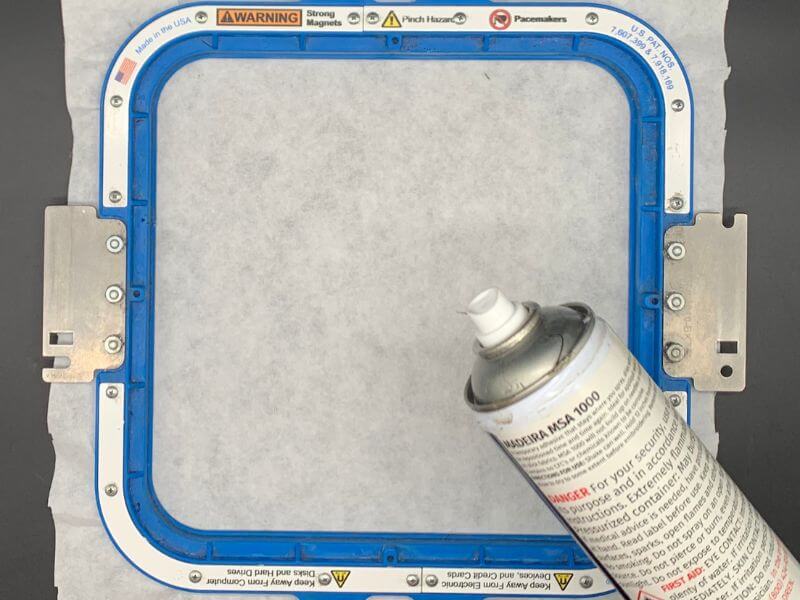
- Hoop a piece of lightweight tearaway or cutaway stabilizer
- Lightly spray the stabilizer and lay down one piece of the white material
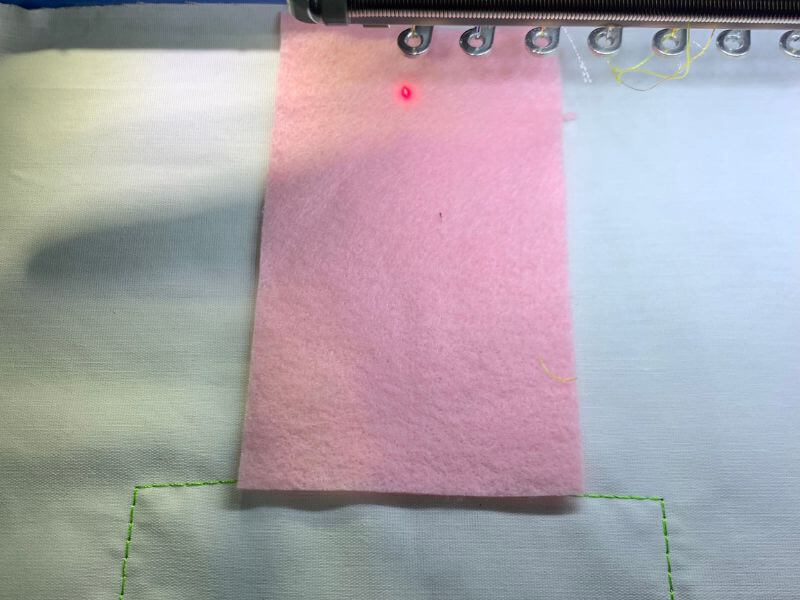
3. Insert in your machine and stitch the bunny bag outline.
4. Lay down the pink felt in the ear area and stitch the tack down line.
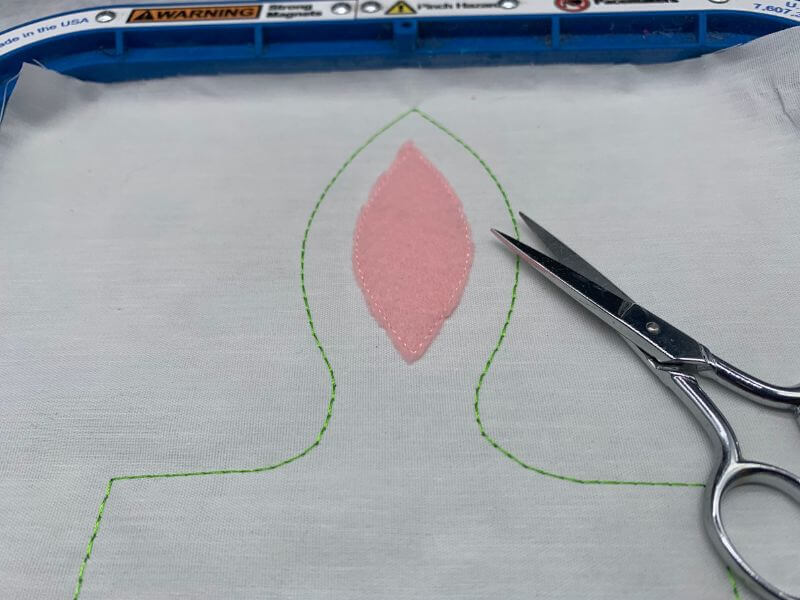
5. Remove from the machine and trim away excess of pink felt
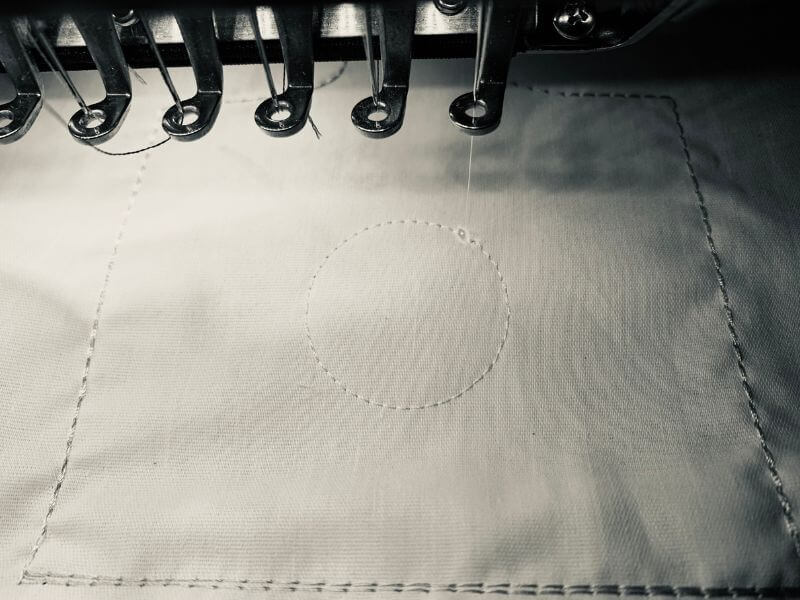
6. Return to the machine and stitch until the end of the circle tail placement line.
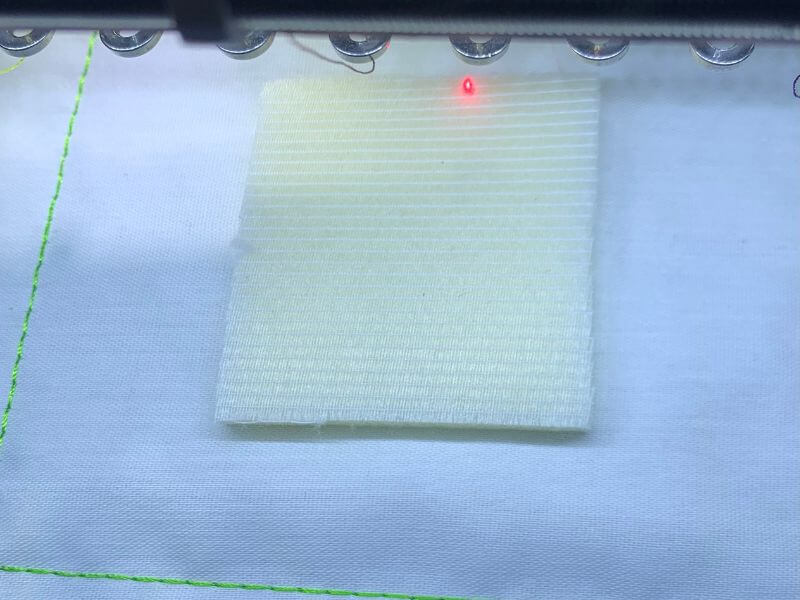
7. To make our puffy tail; first lightly spray the foam square and lay it down over the circle placement line.
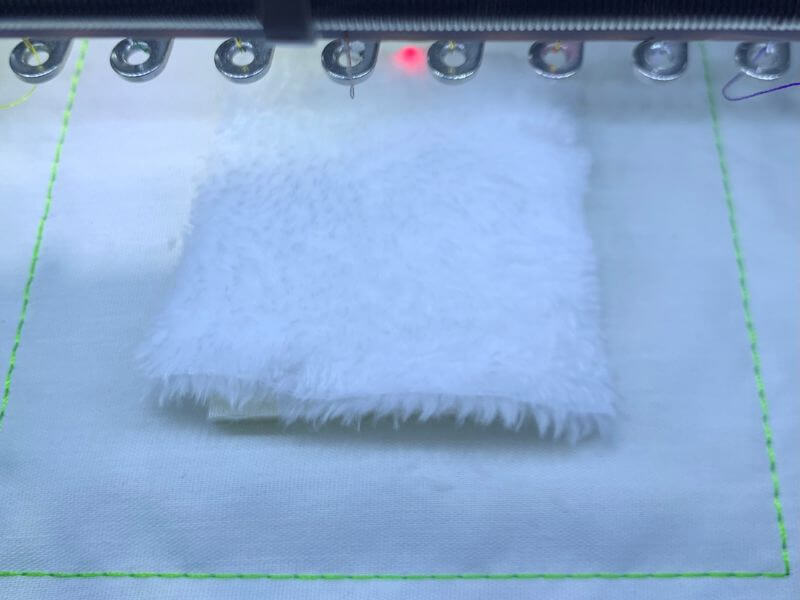
8. Lightly spray the fur square and lay it over the foam piece. Secure with tape if needed.
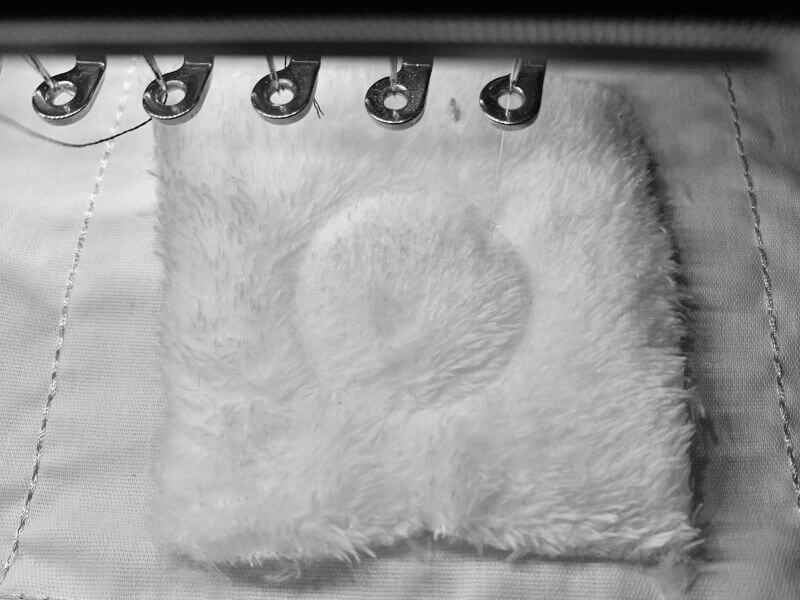
9. Stitch the tack down line.
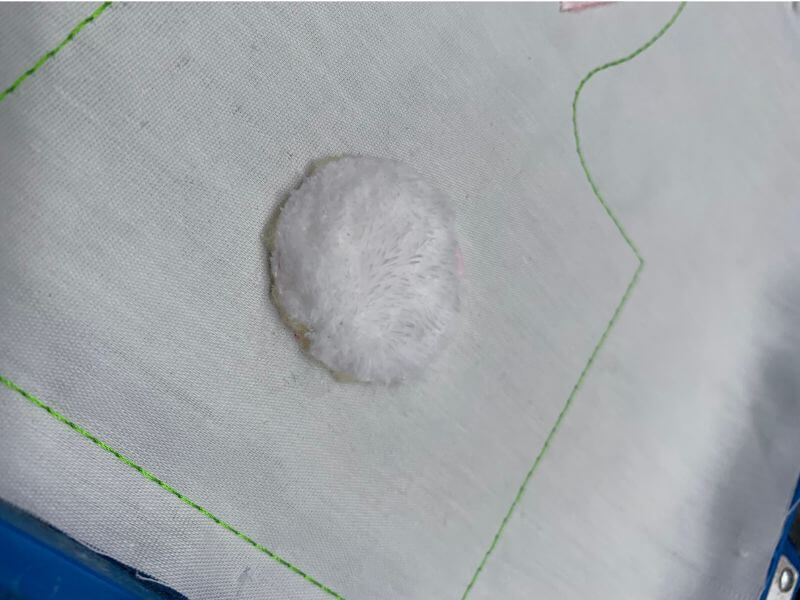
10. Carefully trim the fur along the stitching line first, then the foam, leaving the tail raised.
11. Return to the machine and finish stitching the bunny tail.
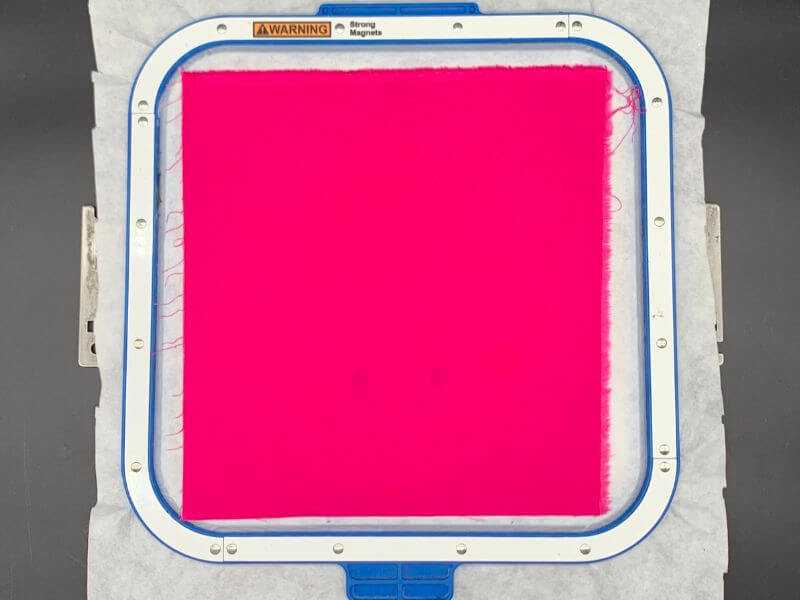
12. Remove from the machine and apply the pink fabric to the back of the stitch out as we did for the front side.
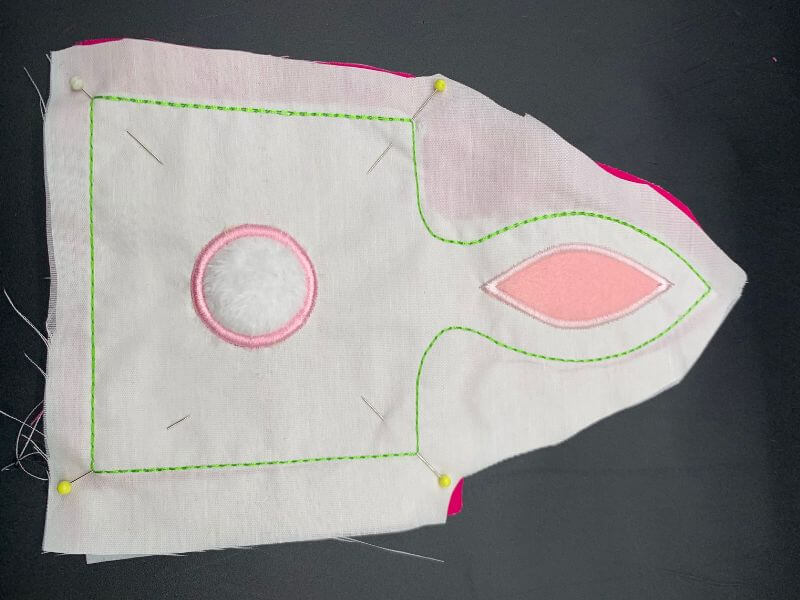
13. Stitch to the end, trim with a 1-inch allowance and prepare to assemble.
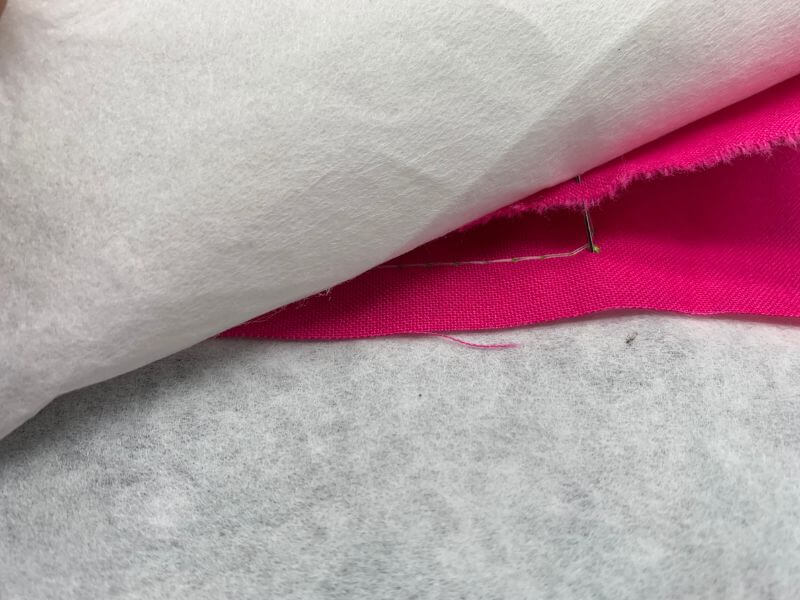
14. Place the pink sides together, place a pin in each of the four corners, and align them together.
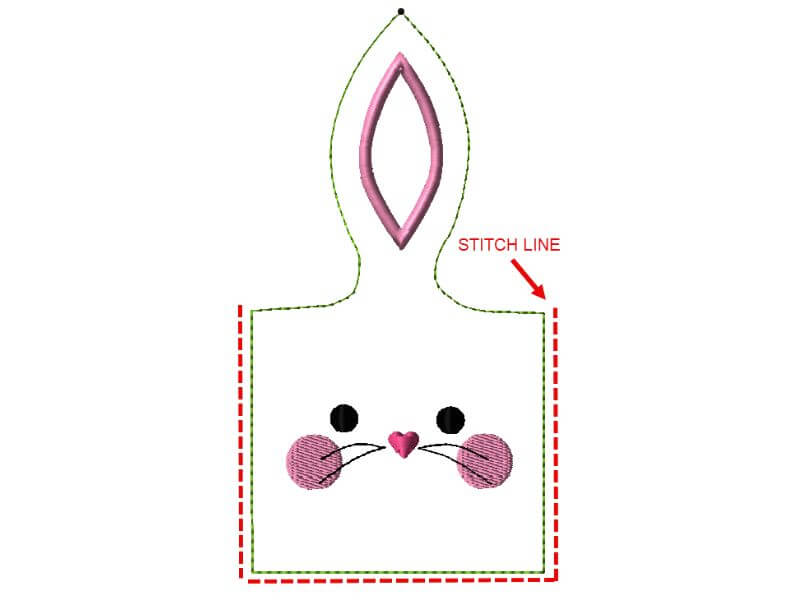
15. Sew the two halves together as shown in the diagram.
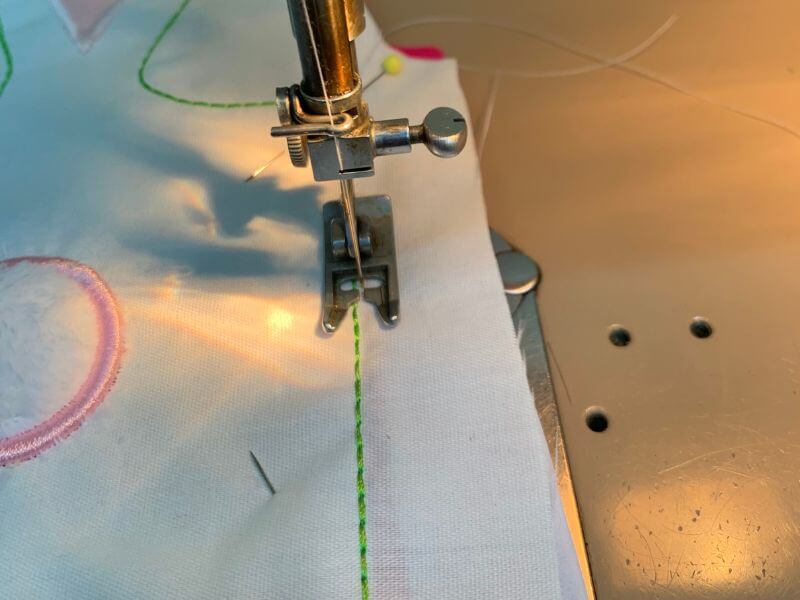
16. Finish sewing your bag outline.
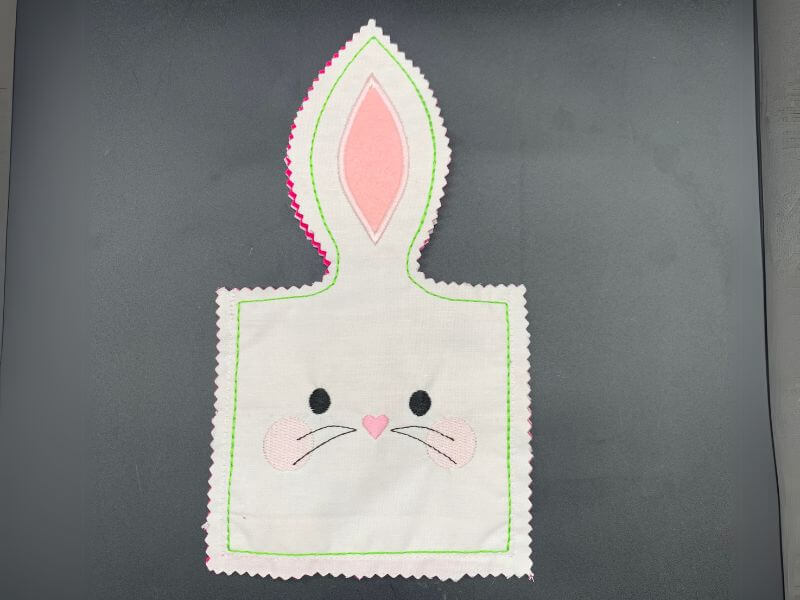
17. We used a pinking shear to trim our bag.
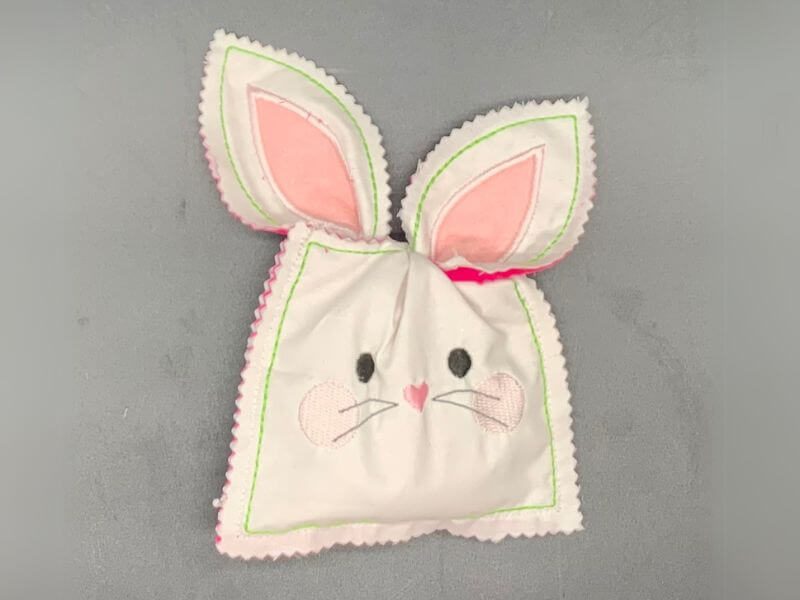
18. To use your bag, fill and tie the ears shut.
Wrap Up Your Easter Stitching!
And just like that, your adorable bunny bag is ready to be filled with Easter goodies! Which ever software you used to create this festive project, this cute bag is sure to bring smiles. Handmade creations always add that extra special touch, and now you have a fun, reusable bag for years to come.
Happy stitching!
