

Ready to add a touch of magic to your embroidery projects? This project is super easy!
In this tutorial, we’ll explore star origami and show you how to bring these stunning designs to life using the Design Doodler software. With easy step-by-step instructions, you’ll discover how to enhance your Doodler skills and create embroidered stars that shine! No matter your experience level, this project is a fun way to expand your Doodler skills and creativity.
Grab your Design Doodler, and let’s get stitching!
Materials
- Medium-weight tear-away stabilizer
- Holographic mylar film or lightweight cotton of your choice
- Temporary embroidery spray
- Embroidery thread
- Design Doodler software
- (Want to try this tutorial but don’t have the software? Try our Design Doodler demo to see how easy creating your own designs can be!)
- Artwork you can download below
Origami Star Tutorial – Digitizing
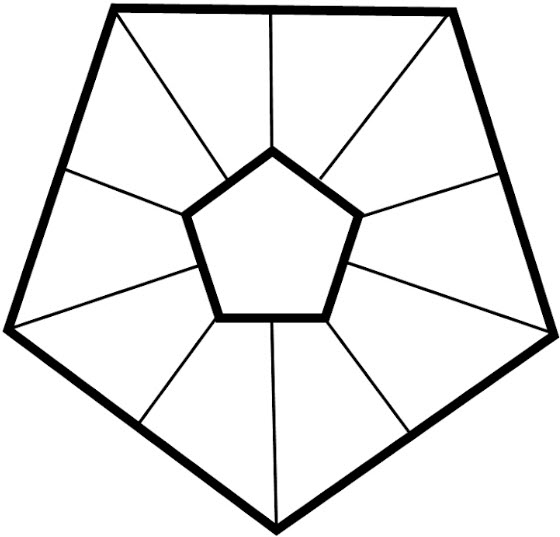
Step 1: Insert your artwork into your Doodler design space
Step 2: Let’s use pathing to cover all these lines to have fewer trims. As shown, you will digitize around the outside first, then the straight lines. Use the running stitch and the straight line tool for the inside lines first, following the arrows shown.

Step 3: Now digitize around the outside and inside pentagram—use a satin (steil) stitch at 3 mm with the straight-line tool.


Step 4: Create a loose tatami fill to secure the sparkly mylar! Digitize a closed-filled object around the outside of the pentagram.

Step 5: Change the tatami fill to a spacing of 3 mm, change the “Traveling Route” to “Edge,” and “Remove Underlay.”

Step 6: Move the filled pentagram to the first position in your sequence (so it stitches first).

You’ve just created your very own origami star design!
Using the materials listed above, start stitching your design.
Origami Star Tutorial – Embroidering
Step 1: Hoop your stabilizer.

Step 2: Using a very light mist of temporary embroidery spray, secure a piece of mylar in your hoop (to avoid making your hoops sticky, cover the sides of your hoop with a paper towel).

Step 3: Turn the hoop over and secure another piece of mylar. You can use a contrasting color. If necessary, secure more firmly with tape.

Step 4: Place your hoop in your machine and start stitching.
Step 5: Remove the hoop from the machine and pop out the stars. If necessary, use scissors to detach them.

Step 6: Trim the fuzzies from the edges of the star with scissors or use a flame.
You’re finished! It’s time to fold up your star.
You’ll need to understand a “mountain” fold, which looks like this!

Start by folding “mountains” on the “right” side of the star. The mountains will be the points of the star.


Strengthen the folds by sharply creasing.

Folding back and forth will strengthen the crease.

Flip the star over and make more mountains! These will be on the flat sides.


Flip it over, and you have a fabulous 3D sparkly star!

What should you do with your new sparkly project?
These are great for the upcoming Christmas holiday. They can be used as ornaments on your Christmas table, made into several to decorate your Christmas tree, or used on special occasions!
Want to switch up the look of them? Here are some variations you can try:
- Using A light patterned fabric on one side
- Try a fun fill-in-your-pentagram
- Use textured paper
Try this tutorial, and let us know what you think! We’d love to see your finished product or answer any of your Doodler questions in our Design Doodler Facebook group.


